Navicat Premium 实用技巧
Navicat 中怎么查看数据库密码
有时候,我们在连接 Navicat 中创建了一个数据库连接并成功连接后忘记了密码,这个时候我们可以通过以下方法来通过 Navicat 现有的数据库连接配置来获取其密码。
第一步: 点击 Navicat 菜单栏 ,导出数据库连接配置,导出连接获取到
connections.ncx文件
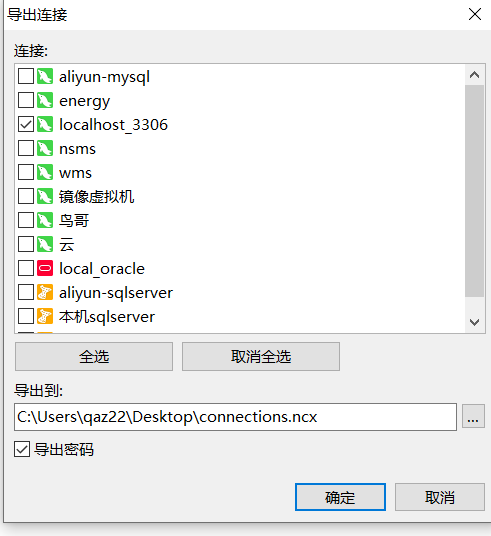
图 11 导出数据库连接配置(勾选导出密码)
<?xml version="1.0" encoding="UTF-8"?>
<Connections Ver="1.4">
	<Connection ConnectionName="localhost_3306" ProjectUUID="" ConnType="MYSQL" OraConnType="" ServiceProvider="Default" Host="localhost" Port="3306" Database="" OraServiceNameType="" TNS="" MSSQLAuthenMode="" MSSQLAuthenWindowsDomain="" DatabaseFileName="" UserName="root" Password="E00641F75A8FFC2E7AF00CC29732DB6E" SavePassword="true" SettingsSavePath="C:\Users\qaz22\Documents\Navicat\MySQL\Servers\localhost_3306" SessionLimit="0" Encoding="0" Keepalive="false" KeepaliveInterval="240" MySQLCharacterSet="true" Compression="false" AutoConnect="false" NamedPipe="false" NamedPipeSocket="" OraRole="" OraOSAuthen="false" SQLiteEncrypt="false" SQLiteEncryptPassword="" SQLiteSaveEncryptPassword="false" UseAdvanced="false" SSL="false" SSL_Authen="false" SSL_PGSSLMode="REQUIRE" SSL_ClientKey="" SSL_ClientCert="" SSL_CACert="" SSL_Clpher="" SSL_PGSSLCRL="" SSL_WeakCertValidation="false" SSL_AllowInvalidHostName="false" SSL_PEMClientKeyPassword="" SSH="false" SSH_Host="" SSH_Port="22" SSH_UserName="" SSH_AuthenMethod="PASSWORD" SSH_Password="" SSH_SavePassword="false" SSH_PrivateKey="" SSH_Passphrase="" SSH_SavePassphrase="false" SSH_Compress="false" HTTP="false" HTTP_URL="" HTTP_PA="" HTTP_PA_UserName="" HTTP_PA_Password="" HTTP_PA_SavePassword="" HTTP_EQ="" HTTP_CA="" HTTP_CA_ClientKey="" HTTP_CA_ClientCert="" HTTP_CA_CACert="" HTTP_CA_Passphrase="" HTTP_Proxy="" HTTP_Proxy_Host="" HTTP_Proxy_Port="" HTTP_Proxy_UserName="" HTTP_Proxy_Password="" HTTP_Proxy_SavePassword=""/>
</Connections>
第二步:找到加密密码,然后添加到 PHP 程序中运行破解
在导出的 connections.ncx 文件中找到 Password ,然后复制到下面 PHP 代码中。( 在 decode=navicatPassword->decrypt('复制出来的密码'); )
<?php
class NavicatPassword
{
    protected $version = 0;
    protected $aesKey = 'libcckeylibcckey';
    protected $aesIv = 'libcciv libcciv ';
    protected $blowString = '3DC5CA39';
    protected $blowKey = null;
    protected $blowIv = null;

    public function __construct($version = 12)
    {
        $this->version = $version;
        $this->blowKey = sha1('3DC5CA39', true);
        $this->blowIv = hex2bin('d9c7c3c8870d64bd');
    }

    public function encrypt($string)
    {
        $result = FALSE;
        switch ($this->version) {
            case 11:
                $result = $this->encryptEleven($string);
                break;
            case 12:
                $result = $this->encryptTwelve($string);
                break;
            default:
                break;
        }

        return $result;
    }

    protected function encryptEleven($string)
    {
        $round = intval(floor(strlen($string) / 8));
        $leftLength = strlen($string) % 8;
        $result = '';
        $currentVector = $this->blowIv;

        for ($i = 0; $i < $round; $i++) {
            $temp = $this->encryptBlock($this->xorBytes(substr($string, 8 * $i, 8), $currentVector));
            $currentVector = $this->xorBytes($currentVector, $temp);
            $result .= $temp;
        }

        if ($leftLength) {
            $currentVector = $this->encryptBlock($currentVector);
            $result .= $this->xorBytes(substr($string, 8 * $i, $leftLength), $currentVector);
        }

        return strtoupper(bin2hex($result));
    }

    protected function encryptBlock($block)
    {
        return openssl_encrypt($block, 'BF-ECB', $this->blowKey, OPENSSL_RAW_DATA|OPENSSL_NO_PADDING);
    }

    protected function decryptBlock($block)
    {
        return openssl_decrypt($block, 'BF-ECB', $this->blowKey, OPENSSL_RAW_DATA|OPENSSL_NO_PADDING);
    }

    protected function xorBytes($str1, $str2)
    {
        $result = '';
        for ($i = 0; $i < strlen($str1); $i++) {
            $result .= chr(ord($str1[$i]) ^ ord($str2[$i]));
        }

        return $result;
    }

    protected function encryptTwelve($string)
    {
        $result = openssl_encrypt($string, 'AES-128-CBC', $this->aesKey, OPENSSL_RAW_DATA, $this->aesIv);
        return strtoupper(bin2hex($result));
    }

    public function decrypt($string)
    {
        $result = FALSE;
        switch ($this->version) {
            case 11:
                $result = $this->decryptEleven($string);
                break;
            case 12:
                $result = $this->decryptTwelve($string);
                break;
            default:
                break;
        }

        return $result;
    }

    protected function decryptEleven($upperString)
    {
        $string = hex2bin(strtolower($upperString));

        $round = intval(floor(strlen($string) / 8));
        $leftLength = strlen($string) % 8;
        $result = '';
        $currentVector = $this->blowIv;

        for ($i = 0; $i < $round; $i++) {
            $encryptedBlock = substr($string, 8 * $i, 8);
            $temp = $this->xorBytes($this->decryptBlock($encryptedBlock), $currentVector);
            $currentVector = $this->xorBytes($currentVector, $encryptedBlock);
            $result .= $temp;
        }

        if ($leftLength) {
            $currentVector = $this->encryptBlock($currentVector);
            $result .= $this->xorBytes(substr($string, 8 * $i, $leftLength), $currentVector);
        }

        return $result;
    }

    protected function decryptTwelve($upperString)
    {
        $string = hex2bin(strtolower($upperString));
        return openssl_decrypt($string, 'AES-128-CBC', $this->aesKey, OPENSSL_RAW_DATA, $this->aesIv);
    }
};


//需要指定版本两种,11或12
//$navicatPassword = new NavicatPassword(11);
//这里我指定的12的版本,原先指定的11,执行之后的密码是乱码
$navicatPassword = new NavicatPassword(12);

//解密
//$decode = $navicatPassword->decrypt('15057D7BA390');
$decode = $navicatPassword->decrypt('复制出来的密码');
echo $decode."\n";
?>
如果自己没有运行 PHP 的环境,那么可以直接到网上找在线运行程序的网站,例如 https://tool.lu/coderunner ,或者直接 百度-代码在线运行
Linux Mysql8.0+数据库密码重置办法
前提:mysql 部署在在自己的 Linux 服务器。
关闭 mysql 服务
systemctl stop mysqld
找到 my.cnf mysql的配置文件
find / -name my.cnf
到达配置文件目录,进入编辑模式
vim my.cnf在文件末尾加入 skip-grant-tables
datadir=/var/lib/mysql
socket=/var/lib/mysql/mysql.sock

log-error=/var/log/mysqld.log
pid-file=/var/run/mysqld/mysqld.pid
skip-grant-tables
重新开启 mysql 服务
systemctl start mysqld
进入 mysql ,不用输入密码直接回车进入。
mysql -u root -p, 回车进入,然后不输入密码再回车,即可进入 mysql。
use mysql;, 然后执行命令清空指定用户的密码update user set authentication_string="" where user = "root";退出 mysql , 然后重新编辑 my.cnf 文件,将
skip-grant-tables注释或删除掉。重启 mysql ,
systemctl restart mysqld;进入 mysql ,不用输入密码直接回车进入。
mysql -u root -p, 回车进入,然后不输入密码再回车,即可进入 mysql。
重置指定用户密码,
alter user 'root'@'localhost' identified by 'NewPassword';