4. 组件
4.1. 组件的使用
无论是使用全局组件还是局部组件,它都需要经过三个步骤:
创建组件
将组件注册到应用
将组件于有root根即有Vue实例的标签内使用
Vue.js 创建组件构造器的方式如下代码所示:
var MyComponent = Vue.extend({
template: '<p>This is a component</p>'
});
这样,我们就获得了一个组件构造器,但现在还无法直接使用这个组件,需要将组件注册到应用中。
对于组件的命名,W3C 规范是字母小写且包含一个短横杠“-”。
与过滤器和指令一样,组件的注册也有全局和局部之分。
4.1.1. 全局注册
Vue.component('my-component', MyComponent);
这个组件是全局注册的。也就是说它们在注册之后可以用在任何新创建的 Vue 根实例 (new Vue) 的模板中。
4.1.2. 局部注册
全局注册往往是不够理想的。
局部注册则限定了组件只能在被注册的组件/ Vue 根实例中使用,而无法在其他组件/ Vue 根实例中使用。
var vm2 = new Vue({
el: '#sign-up2',
components: {
'my-component': MyComponent
}
});
若使用如上代码注册组件,则说明该组件只能在 vm2 根实例中使用,在该实例之外使用该组件是使用不了该组件的。
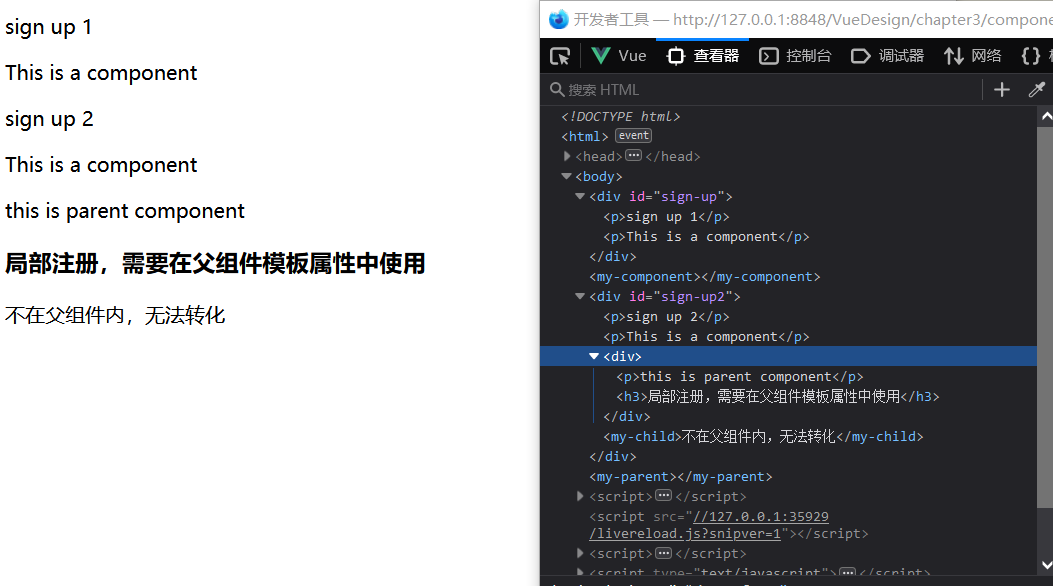
4.1.3. 实例
<body>
<div id="sign-up">
<p>sign up 1</p>
<my-component></my-component>
</div>
<my-component></my-component>
<div id="sign-up2">
<p>sign up 2</p>
<my-component></my-component>
<my-parent>
<my-child>被覆盖</my-child>
</my-parent>
<my-child>不在父组件内,无法转化</my-child>
</div>
<my-parent></my-parent>
</body>
var MyComponent = Vue.extend({
template: '<p>This is a component</p>'
});
Vue.component('my-component', MyComponent);
var vm = new Vue({
el: '#sign-up'
});
var my_child = Vue.extend({
template: '<h3>局部注册,需要在父组件模板属性中使用</h3>'
});
var my_parent = Vue.extend({
template: "<div><p>this is parent component</p><my-child></my-child></div>",
components:{
'my-child':my_child
}
});
var vm2 = new Vue({
el: '#sign-up2',
components: {
'my-parent': my_parent
}
});
4.1.4. 注册简化–注册语法糖
// 全局注册
Vue.component('my-component', {
template : '<p>This is a component</p>'
})
// 局部注册
var Parent = Vue.extend({
template: '<div> \
<p>This is a parent component</p> \
<my-child></my-child> \
</div>',
components: {
'my-child': {
template : '<p>This is a child component</p>'
}
}
});
4.2. 组件的可复用性
data 必须是一个函数.
Vue.component('button-counter', {
data: function () {
return {
count: 0
}
},
template: '<button v-on:click="count++">You clicked me {{ count }} times.</button>'
})
通过代码我们可以发现,组件的 data 属性和我们之前直接的提供对象不同,是通过函数返回值的形式赋值的。这样做的好处是实现组件的可复用性,当一个 Vue 实例有多个组件实例的情况下,每个组件实例可以维护一份被返回对象的独立的拷贝。换而言之,即 Vue 实例本身不提供数据存储,只是为每个组件实例提供初始化数据,而每个组件得数据在其组件实例中各自存储。
4.3. prop 属性
4.3.1. 命令与使用
HTML 中的 attribute 名是大小写不敏感的,所以浏览器会把所有大写字符解释为小写字符。这意味着当你使用 DOM 中的模板时,camelCase (驼峰命名法) 的 prop 名需要使用其等价的 kebab-case (短横线分隔命名) 命名。
<!-- 在 HTML 中是 kebab-case 的 -->
<blog-post post-title="hello!"></blog-post>
Vue.component('blog-post', {
// 在 JavaScript 中是 camelCase 的
props: ['postTitle'],
template: '<h3>{{ postTitle }}</h3>'
})
4.3.2. 显式说明 props 的元素的类型
通过前一个例子我们知道,我们通常希望每个 prop 都有指定的值类型,比如上一个例子的 postTitle ,但是我们完全可以传入一个非 String 类型的对象;这个时候,如果我们在 props 中预先设定了目标类型,那么这不仅为你的组件提供了文档,还会在它们遇到错误的类型时从浏览器的 JavaScript 控制台提示用户。
props: {
title: String,
likes: Number,
isPublished: Boolean,
commentIds: Array,
author: Object,
callback: Function,
contactsPromise: Promise // or any other constructor
}
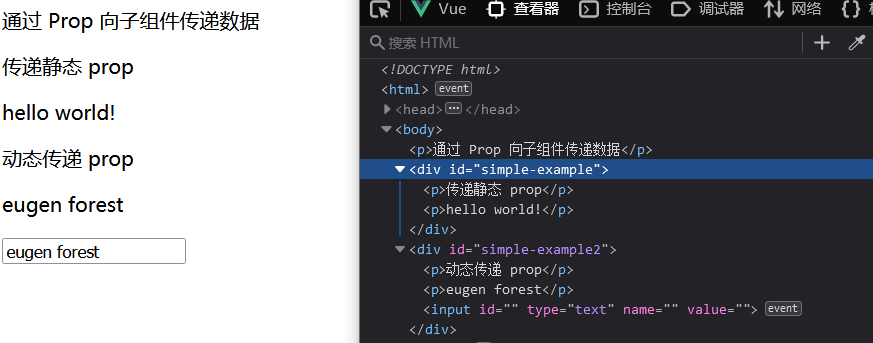
4.3.3. 传递静态或动态 Prop
<p>通过 Prop 向子组件传递数据</p>
<div id="simple-example">
<p>传递静态 prop</p>
<my-example message="hello world!"></my-example>
</div>
<div id="simple-example2">
<p>动态传递 prop</p>
<my-example :message="message"></my-example>
<input type="text" name="" id="" value="" v-model="message" />
</div>
var MyExample = Vue.extend({
props: {
message: String,
},
template: '<p>{{message}}</p>'
})
var vm = new Vue({
el: '#simple-example',
components: {
'my-example': MyExample
}
})
var vm2 = new Vue({
el: '#simple-example2',
data: {
message: "hello vue"
},
components: {
'my-example': MyExample
}
})
备注
使用不同对象来向子组件传递数据的具体方法大同小异,需要了解更多 点击前往官网查看更多关于传递静态或动态 Prop
4.3.4. 单向数据流
通过前面两例子,我们可以发现数据流向是从父组件到子组件的。
所有的 prop 都使得其父子 prop 之间形成了一个单向下行绑定:父级 prop 的更新会向下流动到子组件中,但是反过来则不行。这样会防止从子组件意外变更父级组件的状态,从而导致你的应用的数据流向难以理解。
额外的,每次父级组件发生变更时,子组件中所有的 prop 都将会刷新为最新的值。这意味着你不应该在一个子组件内部改变 prop。如果你这样做了,Vue 会在浏览器的控制台中发出警告。
但是,由于功能需要,我们的子组件往往需要对从 props 中获取的数据进行修改。
以下有两种常见的试图变更一个 prop 的情形:
用来传递一个初始值
以一种原始的值传入且需要进行转换
4.3.4.1. 通过 prop 用来给子组件传递一个初始值
这个 prop 用来传递一个初始值;这个子组件接下来希望将其作为一个本地的 prop 数据来使用。在这种情况下,最好定义一个本地的 data property 并将这个 prop 用作其初始值:子组件从父组件中获取数据并在自己组件内独立创建一个数据空间。
<div id="once-affect">
<p>数据的单向单次流动</p>
<p v-text="message"></p>
<input type="text" name="" id="" value="" v-model="message"/>
<hr >
<once-affect-child :message="message"></once-affect-child>
</div>
Vue.component('once-affect-child',{
props:{
message:String
},
data:function(){
return{
info:this.message
}
},
template:'<div> \
<input type="text" name="" id="" value="" v-model="info" /> \
<p v-text="info"></p> \
</div>'
});
var affect_parent=new Vue({
el:'#once-affect',
data:{
message:"hello world!!"
}
})
4.3.4.2. prop 以一种原始的值传入且需要进行转换
这个 prop 以一种原始的值传入且需要进行转换。在这种情况下,最好使用这个 prop 的值来定义一个计算属性:
props: ['size'],
computed: {
normalizedSize: function () {
return this.size.trim().toLowerCase()
}
}
警告
注意在 JavaScript 中对象和数组是通过引用传入的,所以对于一个数组或对象类型的 prop 来说,在子组件中改变变更这个对象或数组本身将会影响到父组件的状态。
4.3.5. 非 prop 的 attribute
在组件的非 prop 的 attribute的传递方法有以下三种:
传递给组件模板的根标签
禁用 Attribute 继承
替换/合并已有的 Attribute
那么,接下来针对以下通用 HTML/JavaScript 文本通过与使用不同类型的传递方法组件的 javascript 代码的运行结果来查看区别:
通用 html 文本:
<div id="not-prop-attr">
<p>{{title}}</p>
<p>{{content}}</p>
<input type="text" name="" id="" value="" v-model="title"/>
<input type="text" name="" id="" value="" v-model="content"/>
<my-component class="describe" style="background-color: antiquewhite;" id="deal-it" message="hello vue" :title="title" :content="content"></my-component>
</div>
通用 javascript 文本:
var not_prop_attr=new Vue({
el:'#not-prop-attr',
data:{
title:'',
content:''
},
components:{
'my-component':MyComponent
}
})
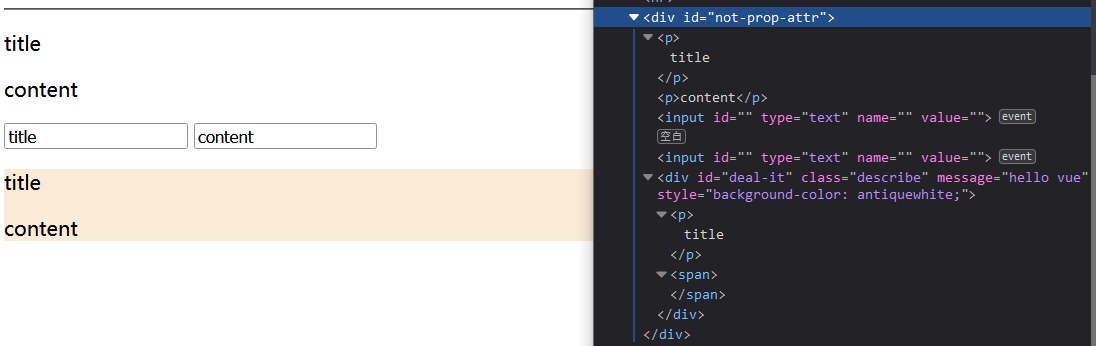
4.3.6. 默认情况下在组件中非 prop 的 attribute的传递情况:传递给组件模板的根标签
显式定义的 prop 适用于向一个子组件传入信息,然而组件库的作者并不总能预见组件会被用于怎样的场景。这也是为什么组件可以接受任意的 attribute,而 这些 attribute(非 prop 的 attribute) 会被添加到这个组件的根元素上。
var MyComponent=Vue.extend({
props : {
title:String,
content:String
},
template:'<div> \
<p>{{title}}</p> \
<span>{{content}}</span> \
</div>'
});
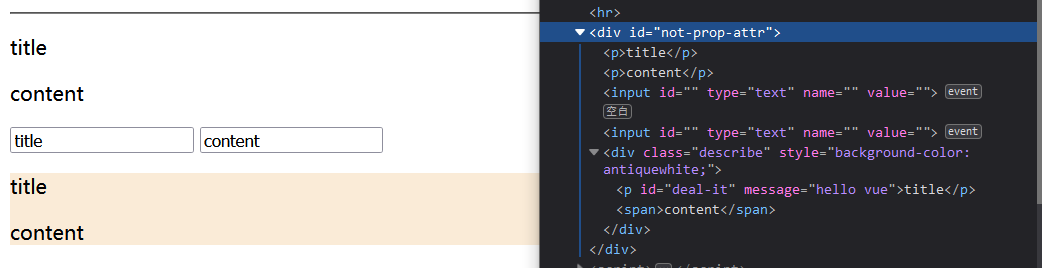
4.3.7. 在使用了禁止传递非 prop 的 attribute属性:在组件的选项中设置 inheritAttrs: false
如果你不希望组件的根元素继承 attribute,你可以在组件的选项中设置 inheritAttrs: false。
Vue.component('my-component', {
inheritAttrs: false,
// ...
})
备注
注意 inheritAttrs: false 选项不会影响 style 和 class 的绑定。
同时,与该方法配合使用的 $attrs property 使用,该 property 包含了传递给一个组件的 attribute 名和 attribute。
有了 inheritAttrs: false 和 $attrs,你就可以手动决定这些 attribute 会被赋予哪个元素。
示例如下:
var MyComponent=Vue.extend({
        inheritAttrs:false,
        props : {
                title:String,
                content:String
        },
        template:'<div> \
        <p v-bind="$attrs">{{title}}</p> \
        <span>{{content}}</span> \
        </div>'
});
4.3.8. 替换/合并已有的 Attribute
对于绝大多数 attribute 来说,从外部提供给组件的值会替换掉组件内部设置好的值。
所以对于以下例子中,传入 message=“hello vue” 就会替换掉 message=“hello template” 并把它破坏!
庆幸的是,class 和 style attribute 会稍微智能一些,即两边的值会被合并起来,从而得到最终的值。
var MyComponent=Vue.extend({
        props : {
                title:String,
                content:String
        },
        template:'<div class="root-template" message="hello template" style="border: aqua;"> \
        <p v-bind="$attrs">{{title}}</p> \
        <span>{{content}}</span> \
        </div>'
});
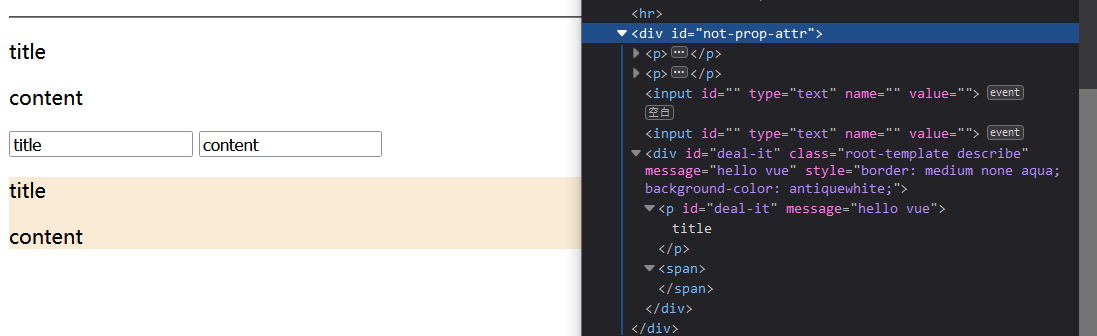
警告
我们发现,如果没有使用 inheritAttrs: false 的情况下使用 $attrs 的话,会出现入上运行中的以下出现两个有相同 id 的标签。最好避免在没有使用 inheritAttrs: false 的情况下使用 $attrs 。
4.4. 自定义事件
4.4.1. 监听子组件的事件
在我们开发组件时,它的一些功能可能要求我们和父级组件进行沟通。
子组件可以通过调用内建的 $emit 方法并传入事件名称来触发一个事件(即 子组件可以通过 $emit 向父组件抛出事件):
<button v-on:click="$emit('enlarge-text')">
Enlarge text
</button>
父级组件可以像处理 native DOM 事件一样**通过 v-on 监听子组件实例的任意事件并执行事件的具体操作**:
<blog-post
...
v-on:enlarge-text="postFontSize += 0.1"
></blog-post>
4.4.2. 子组件中使用 v-model
一般来说,我们如果要在子组件中的 input 使用 v-model 指令,那么通常是写成如下形式。
<custom-input v-model="number"></custom-input>
var MyComponent3=Vue.extend({
        props:{
                size_number:Number
        },
        template:'<input type="number" v-on:input="$emit(\'input\',$event.target.value)" v-bind:value="size_number"/>'
});
为了让它正常工作,这个子组件内的 <input> 必须:
将其 value attribute 绑定到一个名叫 size_number 的 prop 上
在其 input 事件被触发时,将新的值通过自定义的 input 事件抛出
一个组件上的 v-model 默认会利用名为 value 的 prop 和名为 input 的事件,但是像单选框、复选框等类型的输入控件可能会将 value attribute 用于不同的目的。
<base-checkbox v-model="lovingVue"></base-checkbox>
Vue.component('base-checkbox', {
model: {
        prop: 'checked',
        event: 'change'
},
props: {
        checked: Boolean
},
template: '<input  \
                type="checkbox" \
                v-bind:checked="checked" \
                v-on:change="$emit(\'change\', $event.target.checked)" \
        >'
})
这里的 lovingVue 的值将会传入这个名为 checked 的 prop。同时当 <base-checkbox> 触发一个 change 事件并附带一个新的值的时候,这个 lovingVue 的 property 将会被更新。
备注
需要注意的是,你仍然需要在组件的 props 选项里声明 checked 这个 prop。
4.5. 插槽
和 HTML 元素一样,我们经常需要向一个组件传递内容,像这样:
<alert-box>
        Something bad happened.
</alert-box>
可能会渲染出这样的东西:

Vue 自定义的 <slot> 元素让这变得非常简单, 我们向子组件传递的内容被传入 slot 标签中被处理。
Vue.component('alert-box', {
template: ' \
        <div class="demo-alert-box"> \
                <strong>Error!</strong> \
                <slot></slot> \
        </div>'
})
4.6. 动态组件
有的时候,在不同组件之间进行动态切换是非常有用的,比如我们常常见到的 tab 面板切换。
<div id="dynamic-component-demo" class="demo">
        <button v-for="tab in tabs" v-bind:key="tab" v-bind:class="['tab-button', { active: currentTab === tab }]"
                v-on:click="currentTab = tab">
                {{ tab }}
        </button>
        <component v-bind:is="currentTabComponent" class="tab"></component>
</div>
Vue.component("tab-home", {
        template: '\
        <div> \
                <p>Home component</p> \
                <input type="text"> \
        </div>'
});
Vue.component("tab-posts", {
        template: "<div>Posts component</div>"
});
Vue.component("tab-archive", {
        template: "<div>Archive component</div>"
});

new Vue({
        el: "#dynamic-component-demo",
        data: {
                currentTab: "Home",
                tabs: ["Home", "Posts", "Archive"]
        },
        computed: {
                currentTabComponent: function() {
                        return "tab-" + this.currentTab.toLowerCase();
                }
        }
});

当在这些组件之间切换的时候,你有时会想保持这些组件的状态,以避免反复重渲染导致的性能问题。
你会注意到,如果你选择了一个 tab 面板,切换到 Archive 标签,然后再切换回 Home,是不会继续展示你之前输入的内容的。这是因为你每次切换新标签的时候,Vue 都创建了一个新的 currentTabComponent 实例。
重新创建动态组件的行为通常是非常有用的,但是在这个案例中,我们更希望那些标签的组件实例能够被在它们第一次被创建的时候缓存下来。为了解决这个问题,我们可以用一个 <keep-alive> 元素将其动态组件包裹起来。
<!-- 失活的组件将会被缓存!-->
<keep-alive>
        <component v-bind:is="currentTabComponent"></component>
</keep-alive>